Table of Contents
The tale Link to heading
Once upon a time, another developer discovered GH Pages and Hugo. The end.
…and? Link to heading
Okay, for the most curious I’ll go a little deeper than that, but the tale summarises it rather well: I just wanted to create a bunch of personal web pages without the hassle of hosting and such.
In this post I will explain what I did to have this website up and running on the web without handling hosting, domains, etc. Everyone with some familiarity with GitHub and Markdown should be able to make use of this.
The (real) tale Link to heading
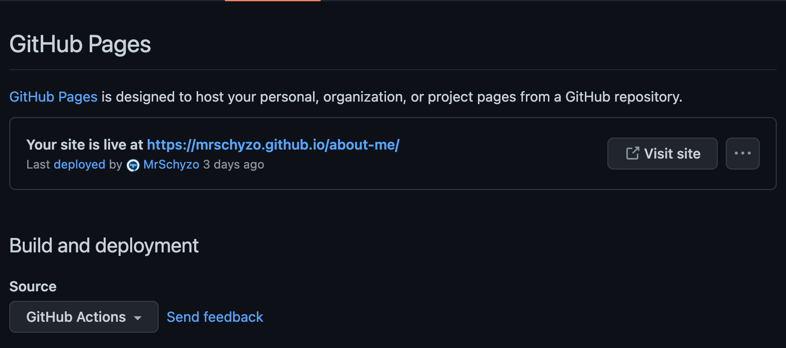
Github repository Link to heading
First thing I did was creating a public GH (GitHub) repository in order to leverage the GH Pages feature.
In order to do this, I logged into my GH and then I went to new repository.
I made sure that repository visibility was public.
After the repository creation, I went to its settings tab that it’s found at <yourRepoUrl>/settings/pages.
Then, I changed the source to GH Actions since I want to have a bit more control on what to do during the deployment of the source code.
See the image below as a reference.
The other option I am aware of is Deploy from a Branch in which, at every deploy, GH will upload the content
of your repository into your site.
GitHub Action Link to heading
Since I selected GH Actions for the source option, I need to find or create a GH Action for this.
For this you can refer to this site GH Action workflow I’ve found and tuned to suit my needs.
more like “copy-pasted and edited until I was happy of the result”
The content can be explained as follows.
When Link to heading
on:
  push:
    branches: ["master"]
    paths:
      - "site/**"

  workflow_dispatch:
The workflow is executed:
- on every
pushtomasterbranch that changes something any file insite/** - on the manual dispatch of the workflow
With which permissions Link to heading
permissions:
  contents: read
  pages: write
  id-token: write
The workflow needs to the following permissions for GITHUB_TOKEN to:
- read the
contents(build and clone the repo) - access in write to
pages(upload and deploy) - write access for
id-tokenscope
How parallel Link to heading
concurrency:
  group: "pages"
  cancel-in-progress: true
The workflow runs one instance at time since concurrency is grouped by a constant expression ("pages" literal string).
If another instance is run, the previous is cancelled.
What to do Link to heading
jobs:
  deploy:
    environment:
      name: github-pages
      url: ${{ steps.deployment.outputs.page_url }}
    runs-on: ubuntu-latest
    steps:
      - name: Checkout
        uses: actions/checkout@v3
      - name: Setup Pages
        uses: actions/configure-pages@v2
      - name: Upload artifact
        uses: actions/upload-pages-artifact@v1
        with:
          path: 'site'
      - name: Deploy to GitHub Pages
        id: deployment
        uses: actions/deploy-pages@v1
The work consists of a job called deploy that uses the github-pages environment.
The url of such environment is determined by the deployment step of the job.
All of the steps are performed in a ubuntu runner.
The steps of such deployments are the following:
- clone the repo
- setup GH Pages
- upload the content to show in GH Pages by passing the
sitedirectory of our repo - deploy GH Pages after uploading the new content
How to test all of this Link to heading
First thing I did was adding a index.html in the site directory, so I verify if the GH workflows does what it’s supposed to do.
Then, I pushed to master branch, the one specified in the workflow file.
Picking Hugo as a static site generator Link to heading
Since I know approximately zero about static site generators, I just did a quick google search and picked the one that seemed the most appealing to my taste - so, yes, the pick was just guided by pure gut feelings.
I ended up picking Hugo although I know that Jekyll exists and it should be also more famous.
Why a static site generator? I am a backend engineer, so I thought that focussing on writing content was more appealing than
bashing my head against html and css to create a sub-par layout when there are people out there already doing a way better job than me.
Installing Hugo locally Link to heading
That was as easy as this. You’ll use your OS go-to package manager - be it brew, choco, apt, snap, pacman, etc.
Creating the site “project” Link to heading
First things first: I cloned the repository I’ve previously created.
Hugo makes it as trivial as running hugo new site <dir>, it’ll create an empty directories structure.
In order to not get lost on focussing in starting completely from scratch, first thing I did was going to the
themes page and I ended up picking hugo-coder theme that also has an
example site to edit and play with.
Playing with the theme’s example site Link to heading
Before getting the example site content and pasting it into my empty directory structure, I added the theme by running
git submodule add https://github.com/luizdepra/hugo-coder.git themes/hugo-coder in the site root.
After linking the theme to my site, I copied the content of the example site in my directory structure and I run
hugo server. This allows having a hot-reloading local server to see your changes while you’re developing.
Some notable pointers Link to heading
I generally go in a BFS fashion when it comes to learn by doing. So I shallowly touched upon multiple topics in order to build a bigger picture. Now, a carousel of Hugo aspects I played a little with will follow.
Configuring the site - config.toml
Link to heading
There is a main configuration file for the site and its values are used by the chosen theme.
In my case, hugo-coder has its own configuration properties.
Some (it reads “non-exhaustive list”) of the most important I touched are:
baseurl- to set my site base URLtheme- to link the installed theme to my siteparamssection - some useful data and metadata that is shown in the landing pagecustomCSS- to set the relative path to additional CSS filestaxonomiessection - to categorise postsparams.social- to add social links and my CVmenu.main- to add links to different sections of my site (about,posts,career)
Playing with the structure Link to heading
Hugo renders markdown into HTML, and the structure of the web pages follows the structure of content - except for the landing page.
At the moment, I was able to edit the landing page only by changing config.toml although I assume that more details can
be understood by looking at the theme’s layouts/index.html.
In any case, apart from the landing page, what I’ve understood is:
- if you want a page like
<baseURL>/a-pageyou create aa-page.mdfile intocontentdirectory - if you want a page like
<baseURL>/a-path/a-pageyou create aa-page.mdfile intocontent/a-pathdirectory
Adding static files to the site Link to heading
I wanted to add my PDF CV for starters. So I used the static directory and I pasted my CV there.
Then, I referred that file in the landing page by just setting the relative url in the relative params.social parameter.
See the following snippet:
[[params.social]]
name = "Resume"
icon = "fa fa-file fa-2x"
weight = 3
url = "cv.pdf"
As you can see here:
- I gave a name to the CV anchor
- I specified an icon, and it seems to me that
hugo-coderusesfork-awesomefor the icons - I gave an order to this “social link”, it’s the third in the links’ list
- The url I’ve assigned to the social link is relative and it’s just
cv.pdfsince it’s in thestaticdirectory
Shortcodes - injecting HTML “components” to markdown Link to heading
Sometimes markdown is not powerful enough (or it can also be just a skill issue, who knows?) to show what you want to show. A way to solve this is defining some custom “tags” that generate HTML to inject in the rendered markdown page.
I needed this mainly for two things:
- I wanted to add a vertical timeline of my past job experiences, because it seems a bit cooler than just a numbered list
- I needed to work around the fact that I wasn’t easily able to refer images from the
staticfiles in this very post.
Vertical timeline, how did I do it? Link to heading
Again, I know nearly zero about practical css, so I just searched on google if somebody stumbled upon the same problem
and fortunately enough somebody already did. I started by looking at this kind soul’s blog post.
I tried a bit with his approach and I “discovered” the existence of Hugo shortcodes:
so I copy-pasted the example and starting editing the custom CSS and the custom HTML template.
I leave the details to the blog post I mentioned some sentences ago, but if you want to see my “borrowed” solution, take a look at the following files:
content/layouts/shortcodes/timeline.html- shortcode for the entire “component”content/layouts/shortcodes/event.html- shortcode for a single timeline itemcontent/content/career.md- how I “invoked” the shortcode
Fighting with URLs for referring static images Link to heading
I put an image in content/static/img/screen-gh-source.png.
When I wanted to refer an image in this page, I tried the following:
- built-in figure shortcode
{{<figure src="img/screen-gh-source.png" title="Where to set GH Actions">}}:- result was an
imgtag referring tohttp://localhost:1313/about-me/posts/this-site/img/screen-gh-source.png
- result was an
- result was an
imgtag referring tohttp://localhost:1313/about-me/posts/this-site/img/screen-gh-source.png
- result was an
- result was an
imgtag referring tohttp://localhost:1313/img/screen-gh-source.png
- result was an
What happens is:
- if the relative path starts with
/, we’re starting from the host root - if the relative path doesn’t start with
/, we’re starting from the page URL
Problem is that I wanted to refer to http://localhost:1313/about-me/img/screen-gh-source.png since http://localhost:1313/about-me is my baseURL.
In order to enforce this I did the following (after googling again, in hope somebody already stumbled upon this):
- I took inspiration from this and created
content/layouts/shortcodes/image.htmlshortcode - I just use the new
imageshortcode into the pages like this{{<image filename="img/screen-gh-source.png" caption="Where to set GH Actions">}}
Putting all together and deploy to GH Pages Link to heading
I wanted to deploy my site as soon as possible and, luckily enough, Hugo has a guide exactly for deploying on GH Pages. What I already did was on par with Step 4, so I just did Step 5+ that consists of adding a GH Workflow for Hugo.
I’ll try to explain the workflow, but notice that some chunks are not that different from my initial workflow.
When Link to heading
on:
  push:
    branches: ["master"]
    paths:
      - "content/**"

  workflow_dispatch:
The workflow reacts to:
- push to
master, if some changes happen tocontent/** - manual start of the workflow through GH GUI
Permissions and concurrency Link to heading
permissions:
  contents: read
  pages: write
  id-token: write

concurrency:
  group: "hugo-deploy"
  cancel-in-progress: true
Same as my GH Workflow.
Defaults Link to heading
defaults:
  run:
    shell: bash
Sets the shell as bash
What to do Link to heading
This is rather different from my action:
- There are two jobs:
buildanddeploy. The latter depends on the former. deployonly does the deployment after the artifact upload to GH Pages
build job
Link to heading
jobs:
  build:
    runs-on: ubuntu-latest
    env:
      HUGO_VERSION: 0.111.3
build job uses an ubuntu runner and stores the desired Hugo version to an environment variable
Steps are as follows:
- Installing Hugo CLI to the current runner
- name: Install Hugo CLI run: | wget -O ${{ runner.temp }}/hugo.deb https://github.com/gohugoio/hugo/releases/download/v${HUGO_VERSION}/hugo_extended_${HUGO_VERSION}_linux-amd64.deb \ && sudo dpkg -i ${{ runner.temp }}/hugo.deb - Installing some SASS tool for processing any
scssfile (have I already said that I know zero about this stuff?)- name: Install Dart Sass Embedded run: sudo snap install dart-sass-embedded - Recursively cloning the repo - recursive because of the theme’s git submodule
- name: Checkout uses: actions/checkout@v3 with: submodules: recursive fetch-depth: 0 - Setting up GH Pages - note the
idas it’s needed for the build step as a baseURL- name: Setup Pages id: pages uses: actions/configure-pages@v3 - Installing some NPM dependencies - maybe for the SASS tool…?
- name: Install Node.js dependencies run: "[[ -f package-lock.json || -f npm-shrinkwrap.json ]] && npm ci || true" - Building
contentcontents with Hugo - I’ll explain this a bit more in depth- name: Build with Hugo env: HUGO_ENVIRONMENT: production HUGO_ENV: production run: | pushd content ; hugo \ --gc \ --minify \ --verbose \ --verboseLog \ --printI18nWarnings \ --printMemoryUsage \ --printPathWarnings \ --printUnusedTemplates \ --baseURL "${{ steps.pages.outputs.base_url }}/" && popd- Since I have all the content in
contentdirectory, the worker needs to go there before hugois run with multiple flags-gcwill execute some cleanp in the cache after the build--minifywill reduce the size of the generated code- from
--verboseto--printUnusedTemplatesis just to add a lot of logs to see what’s going on --baseURLis set to whateverpagesstep output is (seeSetting up GH Pagesstep)- the last
&& popdis another shell command separated fromhugoinvocation- this is just to go back to the directory before
pushd contenthas been called - the
&&is used to say “do it only ifhugosucceeds” - a;could’ve swallowed anyhugofailure in the execution!
- this is just to go back to the directory before
- Since I have all the content in
- Uploading the generated content to GH Pages
- name: Upload artifact uses: actions/upload-pages-artifact@v1 with: path: content/public- just note that path is
content/publicbecausehugowill output the generated static site inpublicas default
- just note that path is
deploy job
Link to heading
  deploy:
    environment:
      name: github-pages
      url: ${{ steps.deployment.outputs.page_url }}
    runs-on: ubuntu-latest
    needs: build
    steps:
      - name: Deploy to GitHub Pages
        id: deployment
        uses: actions/deploy-pages@v2
In short:
- it waits for
buildto be successful - tells GH Pages to be published with the previously uploaded artifact
- the environment URL is set to the
deploymentstep’s output
Just push this workflow Link to heading
As soon as you have this GH workflow ready, push it to your main branch and wait for the CI to happen.